Follow these steps to crop and resize a tag or flag
(first on an Apple Computer, then Windows).
1) Open the file by double-clicking.

2) Once open, click on FILE and then DUPLICATE to rename a new version of the file before you edit anything.

3) Now drag a square over the tag or flag you want to resize.

4) Next click on TOOLS and then CROP.

5) You will now see everything else go away and only what you had selected remains on the screen.
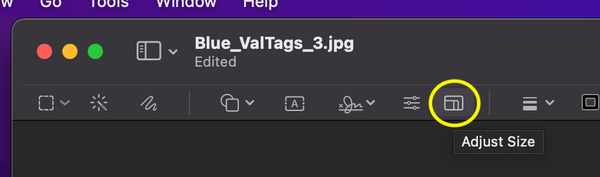
6) Now let's resize the tag by clicking on the "Adjust Size" icon.
Note: If you do not see this row of icons, click "View" and then "Show Markup Toolbar".
7) Here you can enter the exact size you want the tag to be.

8) After you click "OK", you will see the new resized tag.

9) Now to print, click on FILE and then PRINT.

10) Next select how many you want to print per page. Here I selected 6 per page.

11) These programs always default to the "Scale to Fit" option, which will ignore the size you just set the artwork to. Here it has automatically scaled it up 237% !

12) To fix this, click the "Scale" button, and type "100". This will keep your artwork at the actual size you wanted it to be. It's a good idea to always check this when printing any artwork.

That's it! It took a few steps, but nothing too hard. And now you have control to print tags at any size you want. Just remember, if you try to make them larger, the print quality will go down.

