Materials:
- Felt - Most all felt will work but my favorite to use is felt made from wool or wool blends. The reason being is the wool will provide a more quality look, thickness, and less stretching. The felt sold in most craft stores in sheets is a polyester, which can have a patchy thickness that may stretch too easily.
- Needle
- Embroidery floss
- Pins
- Pennant Pattern (Optional - you can make any size or text of your choice!)
- Transfer Tracing paper
- Transfer Pens - Iron-On
- Iron
- Sewing machine (Optional)

You will start by printing your pennant pattern on standard paper and begin the transfer method. For transferring, I will be using tracing paper (Can be purchased here: Aunt Marthas Tracing paper ) and Transfer pens (Can be purchased here: Sulky Iron-On Transfer Pens )
1. Your pattern will print in reverse in order to transfer correctly.
(You can download your pattern here)

2. Trace your pattern onto your tracing paper using your transfer pens.

3. Once traced cut your pattern out from the printer paper.
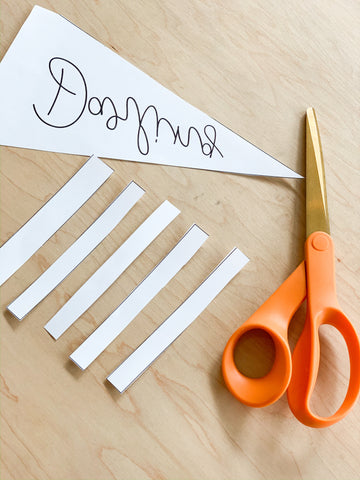
4. Then pin your pattern onto your wool felt. Once pinned cut your pattern out of your felt using your pattern to guide you. Once cut, remove the pattern and pins.

5. Place your tracing paper with the text you traced (Right side facing down) onto your felt. Adjust the location of the text as needed and pin the pattern in place.

6. Now you're ready for your transfer! With your pattern still pinned in place and facing down (Right side facing down - you should be able to read the text correctly.) you will apply your hot dry iron and move it back and forth slowly until you have a clear stamping of your design. (Before removing the pattern, slowly peel only the edge to reveal and confirm the design transferred successfully) Once completed, remove your pins and pattern.
7. Now that all your pieces are cut and your pattern is transferred we can now assemble. Place these strips in place, pin, and sew. I am using a sewing machine but you could also hand-stitch or glue these in place if you choose not to use a sewing machine.


8. Thread your needle and have fun embellishing your cute little pennant!! I will be doing a chain stitch to decorate my pennant and because I am using wool felt that has some weight to it I will not be using an embroidery hoop or stabilizers. Heres how you can do this stitch too!
9. To start : Note: You may simply tie a knot to begin your stitch on the backside or you can ensure your backside looks as neat as the front by following these steps.
10. IF YOU'RE OKAY WITH KNOTS ON THE BACKSIDE YOU CAN SKIP THIS STEP AND GO TO #11. (I think it's fine with small knots.) How to start your stitch: Knots can cause lumps or just ugliness on the backside. To avoid this, start the thread with a waste knot, as follows.
A. Knot one end of the thread and insert the needle from the FRONT, at least 3 inches or so away from where you wish to embroider.
B. Embroider the entire design. Afterward, you'll snip the thread immediately next to the waste note you first created and pull the threads through to the back.
C. Working on the back, skip the two stitches closest to the working thread and pass your needle from right to left under the next stitch. Then pull the thread snug.
D. Continuing away from the end of the embroidery, take the needle under the next few stitches, passing from right to left. Pull the thread snug and cut.
E. What you are doing is wrapping the working thread around the embroidery stitches for a nice hold vs. any unwanted knots.
F. You will use this same method for the tail end of your embroidering.
11. HOW TO CHAIN STITCH:
Embroidery floss usually has six strands loosely twisted together. You can either stitch with all six strands of cotton floss or separate off fewer to give your project a different look. There is no rule. Floss comes in literally hundreds of colors.
Bring your needle up through the fabric at (A) and go back down (in the same hole you just came up in) at (B), leaving a large loop rather than pulling the thread taut. Bring the needle back up at (C),

go through the loop,

and pull the thread loosely to allow it to form a curve.

Go back down at (D),

leaving a large loop instead of pulling the thread taut. Bring the needle back up at (E),

go through the loop, and pull the thread, but only loosely. Continue this stitch following the remainder of your pattern.


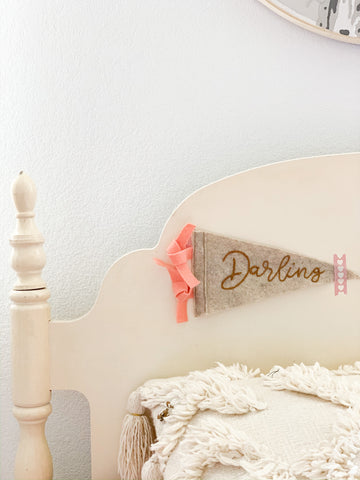
TA-DAH!!! You just created the cutest little embroidered pennant! There are so many stitches and embellishments that you can play with on these pieces! Have fun and enjoy your one-of-a-kind handmade piece for your home! And if you share I would looove to see your creations!!! So be sure to tag me @threadmama_story !!
Enjoy!
Stacey
P.S.
Here is a cute little daisy stitch that could be a fun easy addition! Lazy Daisy stitch with french knots in the center.


